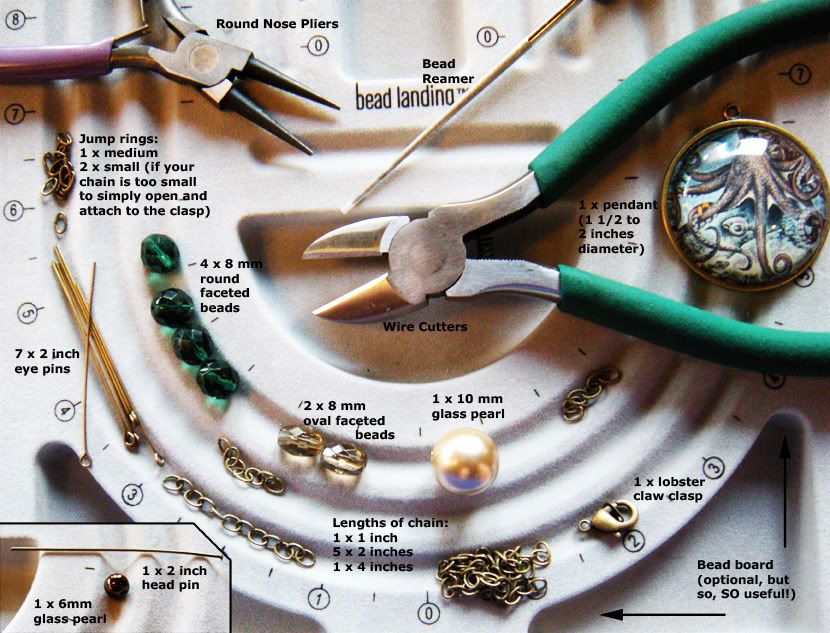
MATERIALS:
Here is a list of everything you'll need for this project, in image form so that you can literally see what you need, and in list form so you can check things off as you get them. Keep in mind chain comes in one long length, you'll have to find a chain you like and then cut it to size yourself. Everything else comes in packs except the pendants, so you will definitely have more materials than you need for this project. That's fine- you can use them to make more jewelry and have a matching set! Click on any image in this tutorial to make it bigger if you're having trouble seeing it.
 |
| If your chain isn't really as open as mine, instead of one 1" length and one 4" length, cut two 1" lengths and buy both larger and smaller jump rings/O rings to accomodate your clasp. |
- Chain
- 5 x 2" lengths
- 1 x 4" and 1" (OR 2 x 1")
- "Findings"- the little bits and pieces
- 2" long eye and head pins
- 7 x eye pins (maybe more if yours are stubborn, or you aren't used to them)
- 1 x head pin (see above)
- Lobster clasp
- Jump rings/O rings
- 1 x large (enough to fit around your chain and move freely)
- 2 x small (only if your lobster clasp can't use your chain's holes as a closure)
- Beads
- 4 x 8 mm round faceted Czech fire-polished glass beads
- 2 x 8 mm oval faceted Czech fire-polished glass beads
- 1 x 10 mm glass pearl
- 1 x 6 mm glass pearl
- Pendant
- Choose any pendant you like- keep in mind that because of the 10 mm pearl that will be directly above it, you're going to want a larger pendant or it will feel proportionately off-kilter. Try not to get one smaller than 1 1/2" wide. Mine was purchased at Michaels Crafts, apparently it is only available in-store, though, so you're going to have to hoof it down there.
- Beading tools
- Bead reamer (in case a hole is too small for the wire, use this- GENTLY- to make it bigger)
- Round nose pliers (REQUIRED)
- Flat nose pliers (optional)
- Wire cutters (REQUIRED)
- Bead board (optional, but so useful it isn't even funny... buying one is the best $10 you'll ever spend if you get into this craft) or a ruler
INSTRUCTIONS:
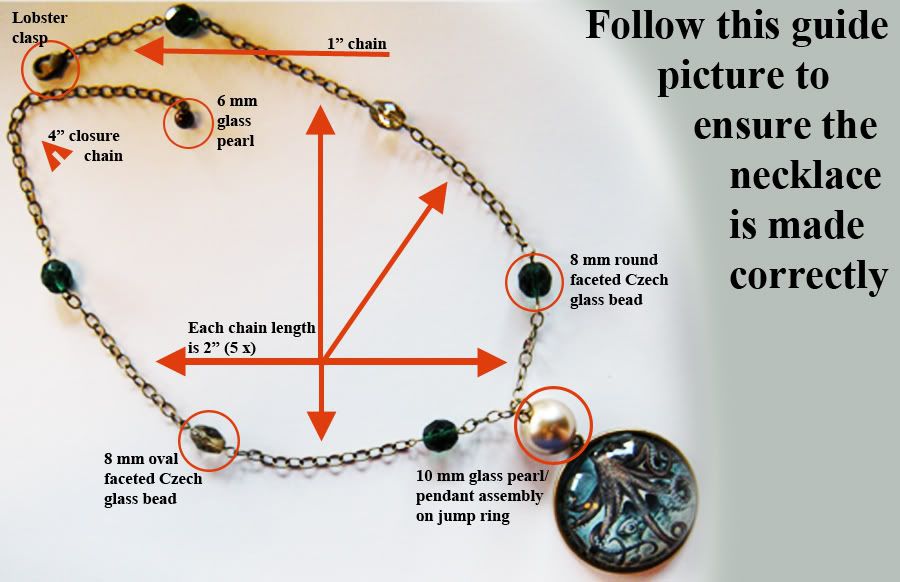 |
| Print this picture out so you have a guide to work with of what goes where! |
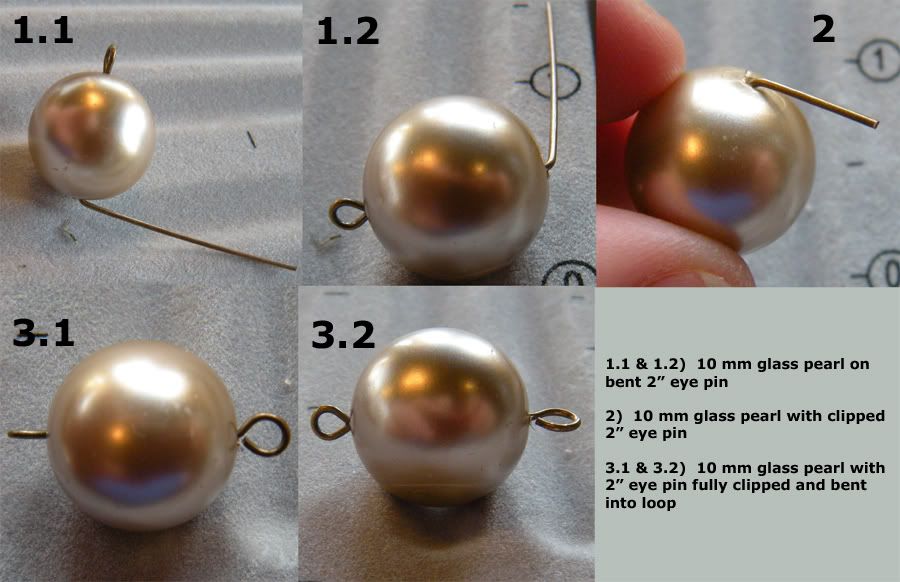
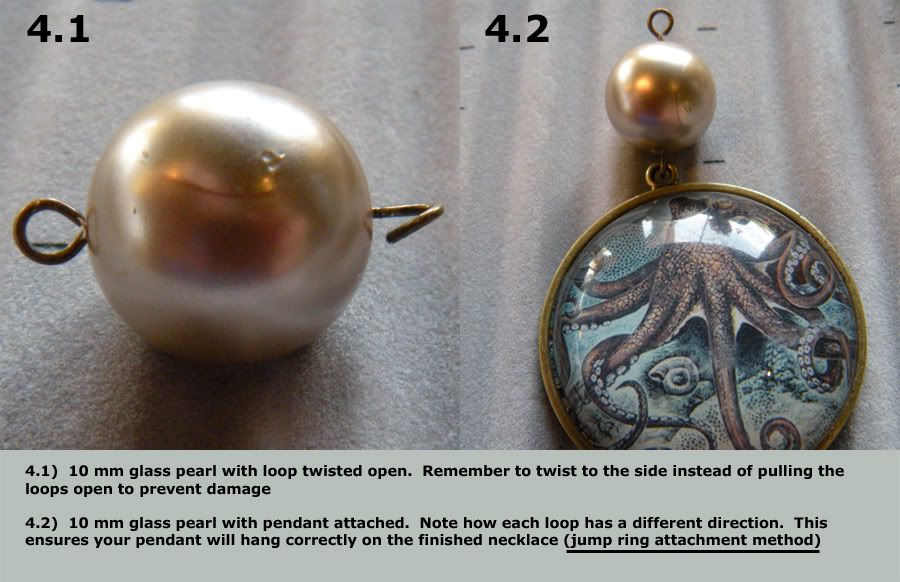
Once you have your chains and all your materials ready, it's time to make the pendant assembly. You'll need the 10 mm glass pearl, the pendant, and one of your 2" eye pins. Thread the eye pin through the bead. Look at the eye (loop) that's already been made for you. Pay attention, because THIS is the most confusing part! You want the eye that you are making to be going in the opposite way that the pre-made eye is. In other words, if you are looking at the pre-made eye and you see the actual loop looking like an open circle- O - you want the one you are making to look like a line - | ; this is so that you can properly hand the pendant from the necklace later [Figs 3.1 & 3.2].
After the wire is cut, it is time to use the round nose pliers to make the second eye. It takes practice to get a perfect eye that looks like it was machined. Here are some tips for getting the best eye loops using the fewest number of pins.
- Grip with the round nose pliers and ROLL the wire! Bending it makes it look flat, and it won't move as it should later.
- Always grip the wire with the pliers as close to the clipped end as possible without them slipping off the wire completely- this helps get the proper "shepherd's crook" shape.
- You will probably tend to twist the wire in a particular direction (I always seem to crank mine a bit to the right) while you are rolling. Fix this by switching hands at the last couple of tweaks and making sure to gently twist the wire back into the proper spot as you finish rolling.
Next it's time to put all the faceted beads on their eye pins. The process is almost exactly the same as putting the 10 mm glass pearl on its eye pin. The one difference is that you want all the loops to be in the same direction- so if you are seeing an O or a | on the pre-made eye, you need to match the direction when you make your own eye.
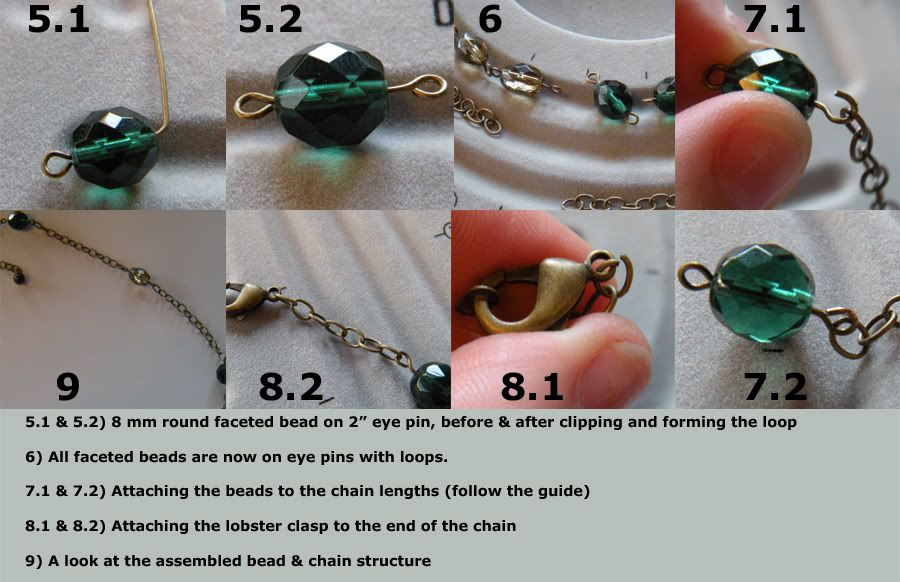
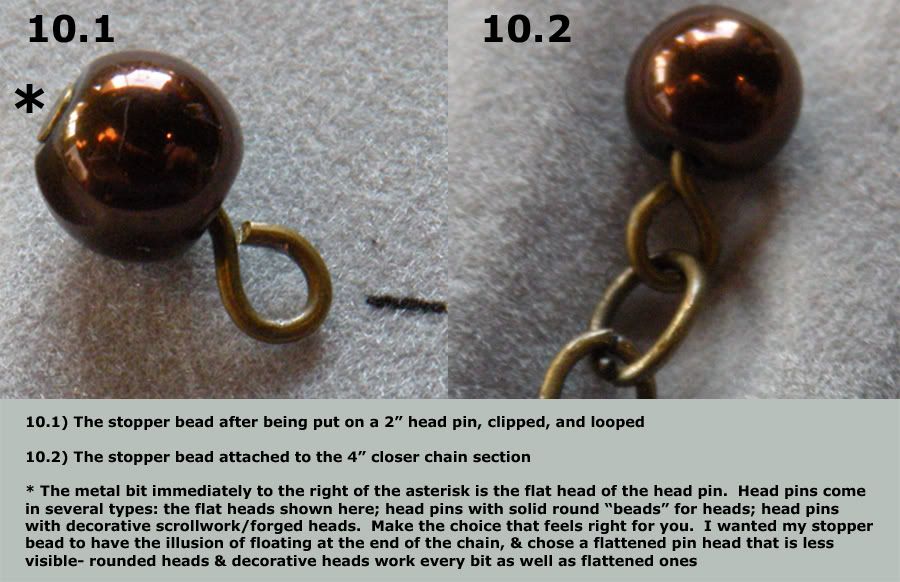
Following the guide, begin to assemble your necklace. I find it easier to to one side at a time- you might be more comfortable building each side in tandem. Open the eye as you did to attach the pendant to the 10 mm pearl, and hook one end of the chain [Fig 7.1]. Close the eye [Fig 7.2] and continue to build the necklace, adding the beads in the order indicated on the guide. On one side, after the last round faceted bead, attach the 1" length of chain. On the other side, attatch the 4" length. On the 1" chain, twist open the last link in the chain and use it to hook the lobster clasp [Fig 8.1] then twist it closed [Fig 8.2]. When you are finished, you should have a structure similar to that in [Fig 9].
{For those of you with smaller chains/different clasps, follow the directions above. When you get to the last two round faceted beads, you will be attaching a 1" length of chain to both sides. Twist open two small jump rings and attach one to both the lobster- or other- clasp and the end of one 1" length, then twist it closed. Attach the other jump ring to the end of the other 1" length of chain and the smaller hole in the mated closure that came with the lobster/other clasp and twist closed. Your main necklace is now finished, so skip to [Fig 11.1] and the directions for attaching the pendant assembly.}
- IF YOU USE THE RIGHT HAND TO OPEN THE CLASP
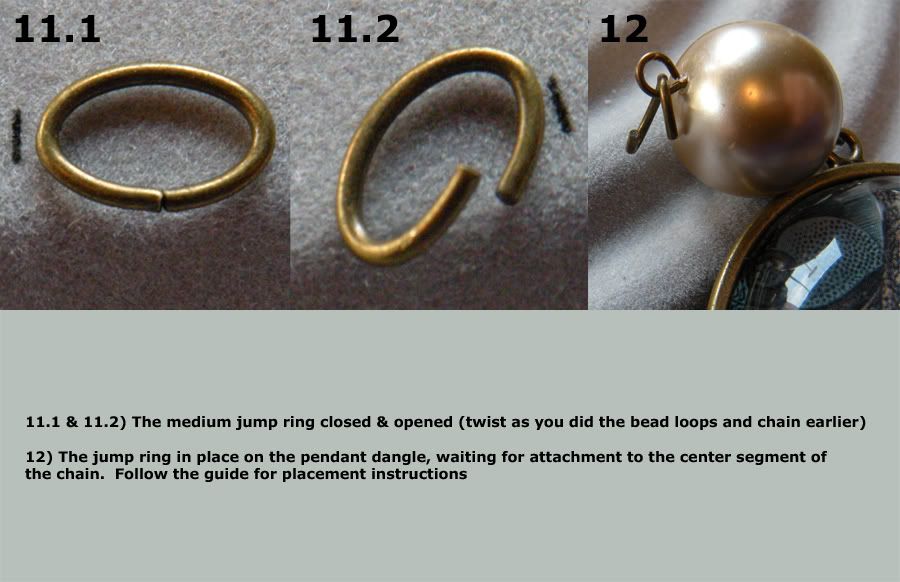
- Lay the necklace flat. Make sure the actual clasp is on the left side of your necklace and the closure is on the right side. Hook the pendant assembly- FACE UP!- over the 2" chain segment between the first two round faceted beads. Twist the jump ring closed.
- IF YOU USE THE LEFT HAND TO OPEN THE CLASP
- Lay the necklace flat. Make sure the actual clasp is on the right side of your necklace and the closure is on the left side. Hook the pendant assembly- FACE UP!- over the 2" chain segment between the first two round faceted beads. Twist the jump ring closed.

Like this tutorial? Have questions on some of the steps? Please drop me a line in the comments below and let me know!
amazing job
ReplyDeleteThank you very much! We worked hard on making sure everything was clear and the instructions covered every step. This is definitely a beginner's tutorial, we wanted everyone to be able to make something like this for themselves and express their own creativity!
DeleteThanks also for being patient with us on our reply, the silly blog didn't let us know you had commented. We came to get the URL for someone, and saw that you'd commented all the way back in November! We definitely do apologize for that delay. Thanks again, and please continue to check back with us!